Quick Start: Set Up Your First Automated Ad, Step by Step
The complete first-time walkthrough — connect an exchange, find your ad in Inactive, configure every setting, and turn the bot on. Every parameter and switch explained.
Pilotbot Team
Author
On this page
This is the full first-time walkthrough. By the end you'll have one ad priced automatically by the bot, and you'll understand every setting and switch on the dashboard. It takes a few minutes.
Step 1 — Connect an Exchange
Pilotbot needs a connection to your exchange so it can read the market and update your ad prices.
- On Binance and Bybit you create an API key with limited permissions (never withdrawal) and paste it in — see Binance and Bybit.
- HTX connects through a browser extension instead of API keys — see connecting HTX.
Once connected, the account appears in the left sidebar.
Step 2 — Open the Dashboard: Your Ads Arrive as "Inactive"
Open the dashboard. If the exchange is connected correctly, your existing P2P ads sync in and appear under the Inactive Ads section — visible, but the bot is not managing them yet. This is your staging area: you set an ad up here before letting the bot work it.
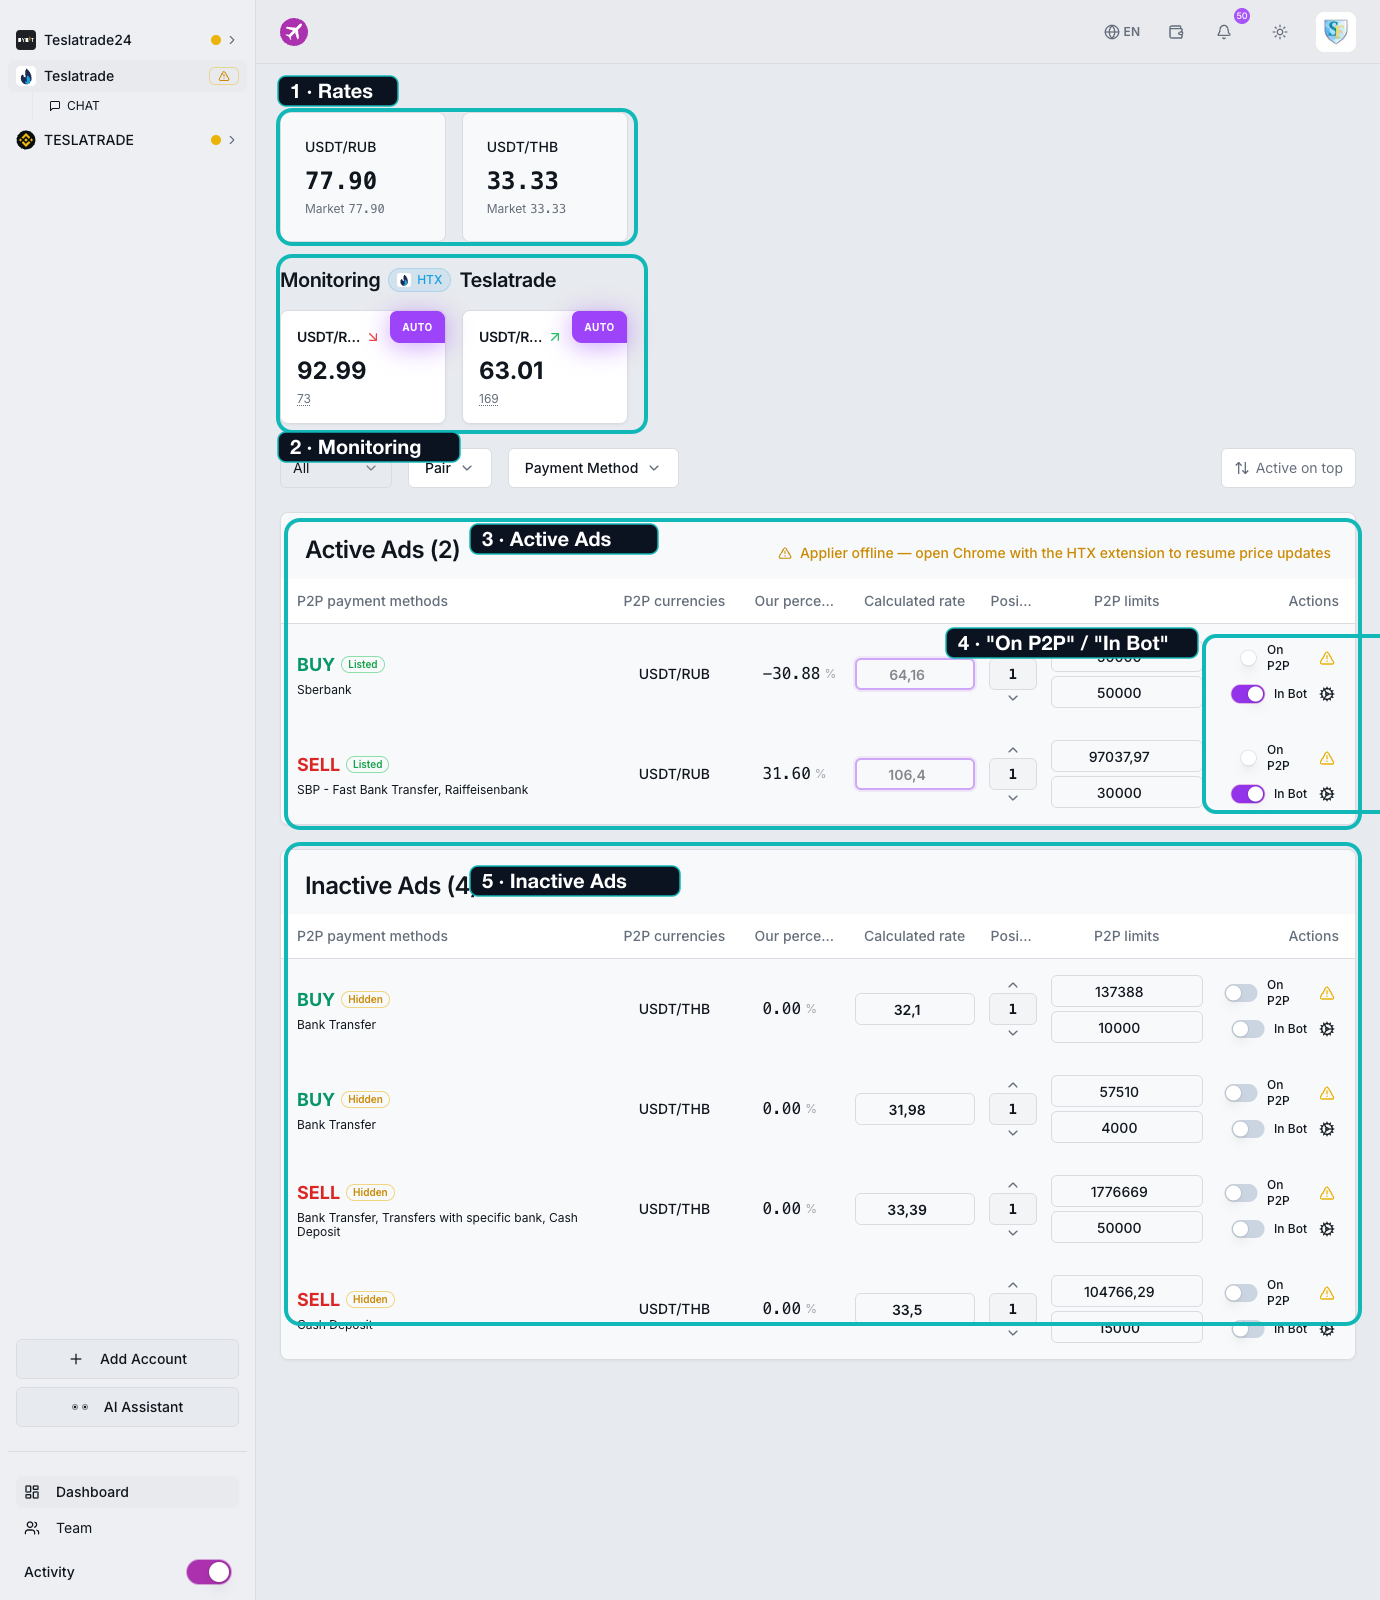
Each ad row shows its columns: payment methods, currency pair, Our %, Calculated rate, Position, and P2P limits, plus the Actions (the two switches and the settings gear).
Step 3 — Configure the Ad's Settings
Open an ad's settings with the gear icon. The settings have three tabs. Set them before turning the ad on. (If an AI agent runs a strategy on the ad, it manages some of these for you and shows them locked.)
Positioning tab
- Auto mode — when on, the Calculated rate (the ad's price) is computed automatically from the market and your settings. When off, the ad is in manual mode and holds the rate you type yourself. Auto is the normal choice.
- Target position — the rank you want in the order book:
1= first place,2= second, and so on. The bot prices the ad to reach that spot each cycle. Default is1. - Overtake step — how far past the competitor ahead of you the bot steps when it takes a position — just enough to be clearly in front. It must be a multiple of the market's minimum tick (the panel shows the tick and example values like
0.01, 0.02, 0.03…). Bigger step = clearer lead but slightly worse price. - Max deviation — the furthest, as a percentage, the price may move from the calculated value. It's your personal guardrail inside the platform's hard ±19.9% safety corridor.
Limit filter tab
This controls which competitors count when the bot works out your position, based on their trade limits.
- Limits from / to — the limit range you care about. Only competitor ads with limits in this band are considered, so you compete against ads for similar order sizes.
- Minimum limit difference — ignores competitors whose limits are almost identical to another ad's, so near-duplicates don't distort your positioning.
Competitor filter tab
This chooses which competitors the bot pays attention to.
- Merchants only — when ticked, only verified exchange merchants count toward your position; ordinary (non-merchant) ads are ignored.
- Ignore competitors — add specific trader nicknames to exclude. Handy for a known bot or an aggressive outlier that would otherwise drag your price around.
Full detail on every field: all the ad settings explained.
Step 4 — Turn the Bot On: the Two Switches
Every ad has two independent switches (turning one on does not turn the other on):
- In Bot — hands the ad to Pilotbot. Turn it on and the ad moves into Active Ads, and the worker starts pricing it — repositioning it every cycle within your safety corridor. An ad can be In Bot even while it isn't listed on the exchange.
- On P2P — whether the ad is actually listed (published) on the exchange. Turn it on to show the ad to buyers, off to hide it.
So the normal working state is In Bot on + On P2P on: the ad is live on the exchange and the bot keeps it competitively priced. Only you turn ads on — the bot never does it by itself. (The one automatic action only ever turns In Bot off — if an ad goes offline on the exchange while managed. The dashboard tells you why.)
Full detail: managing your ads and the two switches.
Understanding the Dashboard Sections
- Rates (top) — one card per pair. The large number is the reference rate the bot prices from; "Market" next to it is the current market rate for comparison. See the rates section explained.
- Monitoring — a live card per managed ad, showing its price and standing, with an AUTO badge in auto mode. You can open the order book from a card to see the competitors just above and below you. See the monitor.
What Happens Next
From here Pilotbot watches the market continuously and repositions your ads whenever it makes sense — you don't need to stay online. Prices update faster on higher plans (see plans and limits). If a price sits still, it's usually the safety corridor holding it — see why a price looks frozen.
Ready? Start with connecting your first exchange.